I first saw these little cuties in a moda bake shop tutorial by Kristie from ocd- obsessive crafting disorder

...and I fell in love with them. So I quickly ordered some of the frames,
and that was about 6 months ago!!
I finally got brave enough to try making one. Kristie has very clear instructions in the Bake Shop tutorial, and there is also a great tutorial over at Making Rebecca Lynne frame-pouch-along. I kind of used both of them.
(Of course I wasn't brave enough to join in the pouch along...I am such a chicken...but have given this a shot now!)
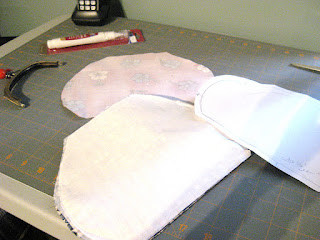
I drew out my pattern to make the template.... (good instructions in both tutorials for this)

I did have a bit of a problem getting the sides to look the same and even....then I realized the the frame was not symmetrical !! (it wasn't my math this time !!!)

But once I figured that out, I cut my fabric (outer and lining), and I used fusible interfacing and muslin as well, to give them a little body.
 I am very happy with the easy of handling this and the firmness of the body of the bag at the end. For the little blue bag, I was using home decor fabric, which was quite think, for both the outside and lining, so didn't add the muslin in that one.
The sewing instructions were very clear for both tutorials. They used different places to leave the opening for turning the bag.... one used the bottom inside seam of the lining and the other the top edge on one side .......
.I tried both!
Although both worked out just fine, I liked leaving the top edge open as it is hidden under the frame, and leaves the lining tidier, in my opinion.

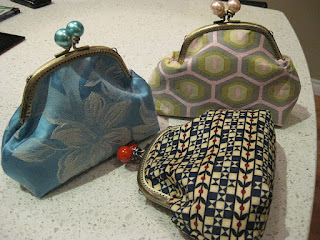
I squared off the bottom at 2", so it actually sits up on its own.

I also added a little pocket inside...I like pockets :)

The only problem I had with the sewing was getting the corner under the hinge neat...

I got a little better with practice...

but still had difficulty with this part. I guess they are supposed to be a little pouchy here ..right??? Isn't that why they call them pouches?? (hehehe)
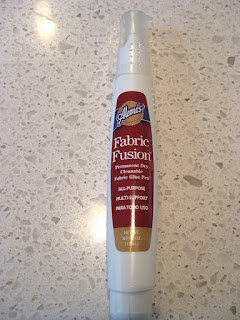
Anyway...next was the glue...what I feared the most! It actually wasn't as bad as I expected..but a little messy. There were several options at the fabric store, and really not any good reason to pick any special one....I used Aleene's "Fabric Fusion" .. and am very happy with it., overall.
The instructions both said to be careful not to get glue on the fabric, which is difficult...(of course they forgot to mention not to get glue in my hair!)
They also said to start working from the edges, and then move to the centre.....Yeah......I had trouble with that! I ended up kind of sliding the whole thing in and squishing it around until I got it all worked in. The sharp object (small flat screw driver) did help...of course it is now covered in glue too.

They said to read the directions on the glue, and if says to wait 1 minute after applying the glue that you really needed to do that. Well.... I read the directions but it didn't say to wait...I think they forgot to mention that...because it would have worked a lot better I think if the glue had been a bit tacky first. I found that the fabric slid around quite a bit until the glue started to dry ....hence my fingers are also covered in glue.

In all honesty..by the third one, it was getting easier..I guess you can teach an old dog new tricks!
All in all, they were not hard to make, although I am not sure that I will rush out and buy more frames....(and I might hide the other 2 that I didn't use under a pile of scraps...never to be seen or heard from again! )
But they are kind of cute...when it is all said and done!
Now off to see what is going on at the TN&TN !
...and I fell in love with them. So I quickly ordered some of the frames,
and that was about 6 months ago!!
I finally got brave enough to try making one. Kristie has very clear instructions in the Bake Shop tutorial, and there is also a great tutorial over at Making Rebecca Lynne frame-pouch-along. I kind of used both of them.
(Of course I wasn't brave enough to join in the pouch along...I am such a chicken...but have given this a shot now!)
I drew out my pattern to make the template.... (good instructions in both tutorials for this)

I did have a bit of a problem getting the sides to look the same and even....then I realized the the frame was not symmetrical !! (it wasn't my math this time !!!)

But once I figured that out, I cut my fabric (outer and lining), and I used fusible interfacing and muslin as well, to give them a little body.

The sewing instructions were very clear for both tutorials. They used different places to leave the opening for turning the bag.... one used the bottom inside seam of the lining and the other the top edge on one side .......
.I tried both!
Although both worked out just fine, I liked leaving the top edge open as it is hidden under the frame, and leaves the lining tidier, in my opinion.

I squared off the bottom at 2", so it actually sits up on its own.

I also added a little pocket inside...I like pockets :)

The only problem I had with the sewing was getting the corner under the hinge neat...

I got a little better with practice...

but still had difficulty with this part. I guess they are supposed to be a little pouchy here ..right??? Isn't that why they call them pouches?? (hehehe)
Anyway...next was the glue...what I feared the most! It actually wasn't as bad as I expected..but a little messy. There were several options at the fabric store, and really not any good reason to pick any special one....I used Aleene's "Fabric Fusion" .. and am very happy with it., overall.

The instructions both said to be careful not to get glue on the fabric, which is difficult...(of course they forgot to mention not to get glue in my hair!)
They also said to start working from the edges, and then move to the centre.....Yeah......I had trouble with that! I ended up kind of sliding the whole thing in and squishing it around until I got it all worked in. The sharp object (small flat screw driver) did help...of course it is now covered in glue too.

They said to read the directions on the glue, and if says to wait 1 minute after applying the glue that you really needed to do that. Well.... I read the directions but it didn't say to wait...I think they forgot to mention that...because it would have worked a lot better I think if the glue had been a bit tacky first. I found that the fabric slid around quite a bit until the glue started to dry ....hence my fingers are also covered in glue.

In all honesty..by the third one, it was getting easier..I guess you can teach an old dog new tricks!
All in all, they were not hard to make, although I am not sure that I will rush out and buy more frames....(and I might hide the other 2 that I didn't use under a pile of scraps...never to be seen or heard from again! )
But they are kind of cute...when it is all said and done!

Now off to see what is going on at the TN&TN !
They are cute as can be, never know that they were a problem. Now the glue in the hair, that's something to deal with. I don't now why we always fear trying a new technique but we do.
ReplyDeleteVery sweet but I think I will work on the 18 snowflakes I have to applique for what is now a NEXT year's Christmas quilt gift. Hey I always wanted to get an early start.
ReplyDeleteThanks for explaining all your process. They look pretty good.
ReplyDeleteThey look awesome and hard to do
ReplyDeleteSo lovely!! Good job! Are they gifts? Great for next Christmas.
ReplyDeleteI think they are really sweet , that frame is what would keep me from trying these but you did a great job!
ReplyDeleteGreat work! Thanks for sharing, I can see that these are not just an easy throw together bag like the drawstring one. Very cute though, and now you can say that you've tried!
ReplyDeleteThey look great! I had a bit of a learning curve, too.... Kind of like making perogies with Grandma, you have to do it by feel, lol! The end result is lovely :) glad the tutorial was of help!
ReplyDeleteThis comment has been removed by the author.
ReplyDelete