Before I start, I just want to say thank you to all those who serve our country, on this Remembrance Day.
Now to move on to my latest adventure in quilting....
I wanted to share my learning process for quilting feathers. I am certainly no expert,, but sometimes that is a good thing. I can tell you about the mistakes I made, so you don't have to! LOL
I am in awe of some of the quilters out there that make such beautiful feathered patterns. There are a number of great tutorials too, so please check with the experts for a more experienced view on this.
Here are a couple that I found very helpful:
Sue Garman and
How to Quilt Feathers
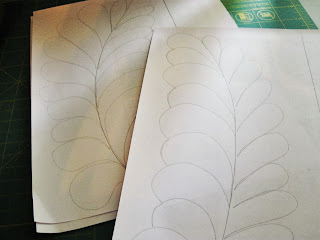
I wanted to use the feathers in the border, so I started on paper. I measured out the 6" border and started practicing the design. I find it very helpful with any FMQ to start first with pencil and paper..
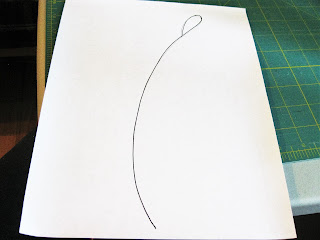
Although I think there are many ways to do these, I started with the long curved stem bottom to top, then started coming down the convex side with the feather loops..
When you get to the bottom, most instructions say to go back up the stem and then repeat the feather loops on the other side, The issue I had with doing this, was that I wanted to travel all the way along the border, so wanted to finish at the top in order to move on up to the next feather! mmmmmm
BUT I also found one tutorial that suggested going up with the feathers. A "Loop and Bump" method. You make the first loop..
then for the second one, travel up the stem and out to form the loop..
Then retrace the outer edge of that loop a short ways and "bump" up into the next loop.
Continue to repeat those 2 steps all the way up the stem.
So now I finished at the top of the feather, and was ready to move on to the next one, just repeating the process. I alternated the direction of the stem curve each time.
Next step was to practice on some smaller scrap blocks... I drew the feathers onto the fabric with chalk first, then tried it out..
I had read somewhere that you can use Press and Seal to make it easier. You press it onto the area you want to quilt, then draw directly onto the Press and Seal with a pen.Then you can just follow the lines. The problem I had was removing the plastic afterward!!
This was just too much work for me! I am basically pretty lazy and will take the easiest route, and this just added extra work, so I quickly scrapped this plan.
Back to the practice pieces. In the beginning I had problems with the thread breaking....a lot! Very frustrating!! So back to reading blogs and tutorials about what I was doing wrong!
Blogland is such an amazing place! I found someone who had the same problems and suggested that it was better to move the fabric away from you as you were sewing (like you normally do for a seam) rather than pull it towards you as you travel down the stem. Now with FMQ you actually go all different directions, so I couldn't really see how this would make a difference, but thought it was worth a try. The only problem was that all my practice sketches were upside down then!!! So I had to practice drawing them the other way...
Low and behold....it worked!!! Now, I am not sure that change is what made the difference, or if I was just holding my head differently, or wearing different socks!!! BUT the feathers went very smoothly after that.
It is important to try to keep the size of the loops as consistent as you can. Easier said than done sometimes! But it is a learning process. Also, sometimes I should have made my loops more even in length, and to fill the border more consistently.

The other thing I did was measure the length of the border and decide how long to make each feather, so they would fit nicely into the length. Then I sketched out the whole border on one side at a time with chalk so that I had a reference to follow.
My feathers certainly are a bit rough around the edges, but I am very proud of them, and will keep working on practicing. Can only get better!!
They are quite fun to do....go ahead....give them a try!
Linking up to
TN&TN....check out what is going on with everyone else here!


